Customer settings
Find this screen
Open: Settings > Customers and Suppliers > Customer Defaults and Settings
How to
Set defaults for your customer accounts
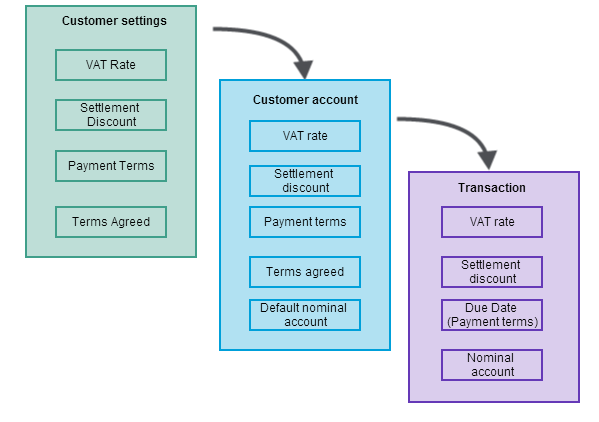
This is where you can enter default settings for your customer accounts and transactions.
Defaults entered here are passed on to each new customer account. Defaults entered on customer accounts are passed on to transactions.
The following diagram shows how this works.
Why set defaults?
Setting defaults can save you time when you create accounts and also helps to prevent errors.
Any changes you make to these defaults are only used when you create a new account. Existing accounts and transactions are not affected.
If you want to apply the changes to your existing accounts, you'll need to update each account separately.
Set default settlement discount details
If
Early settlement days - the default number of days to qualify for the discount.
Discount percentage - the default settlement discount percentage.
If you don't want to set default settlement discount details, leave these options blank.
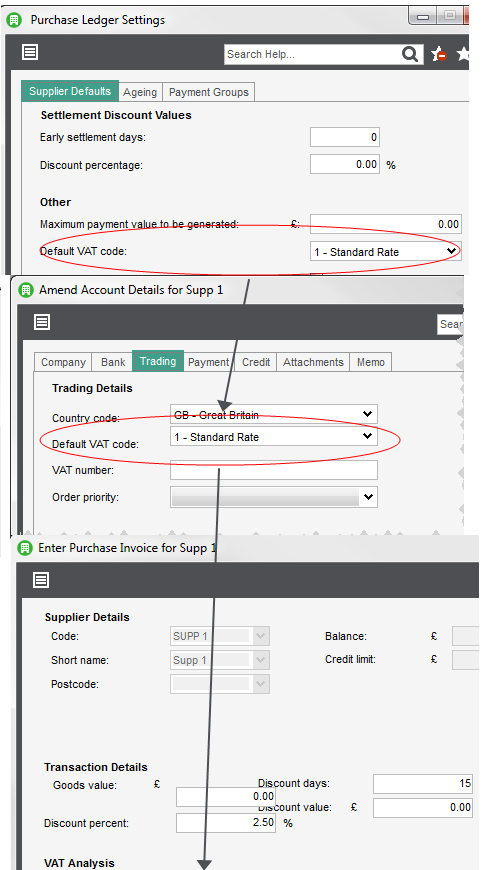
Set a default VAT rate
This is the default VAT rate to be used on your accounts and then passed to your transactions.
If most of your transactions are going to use standard VAT, leave the standard VAT rate selected in the drop-down box.
If the majority of your
This helps you to make sure that the correct VAT rate is used when entering transactions.
For example, when you create an account for an EU
Set default terms agreed
Select this if you want to agree terms on most of your new accounts. You can still change this on individual accounts if you need to.
Don't select this if you want to individually choose whether your
If the Terms Agreed box isn't selected on a
Set the waiting period for bad debts
If a customer doesn't pay you for goods and services on which you have charged and paid VAT, you can get the VAT back from HMRC by claiming bad debt relief.
To reclaim the VAT, the debt must be older than the waiting period specified by the HMRC. You enter this minimum waiting period here. This was 6 months at February 2019.
See the HMRC guidance: VAT Returns (opens in a new tab).
Enable card processing
Use this if you subscribe to Opayo (formerly Sage Pay) and want to record card payments from customers directly into Sage 200.
If you select Enable card processing, you can use the Online Card Receipt feature to record receipts from customers.
See Configure Sage 200 to use Opayo (formerly Sage Pay).
Default allocation date (customers)
You can choose the default allocation date recorded for
-
Use payment/receipt date: The allocation date for the transaction is set to the same date that you enter for the receipt or payment.
For example, if you enter a receipt dated 5 November, then allocate the receipt on 12 November, the allocation date for the transaction will be 5 November.
-
Use system date: The allocation date for the transaction is set to the date when you record the allocation in Sage 200.
For example, if you enter a receipt dated 5 November, then allocate the receipt on 12 November, the allocation date for the transaction will be 12 November.
The default allocation date will be applied when you use the following features:
-
Enter Customer Receipt.
-
Enter Customer Payment.
-
Online Card Receipt.
-
Refund Online Card Receipt.
-
Process Invoice Payments.
-
Maintain Invoice Payment Transactions.
-
Correct Transactions, for Correct and Reverse.
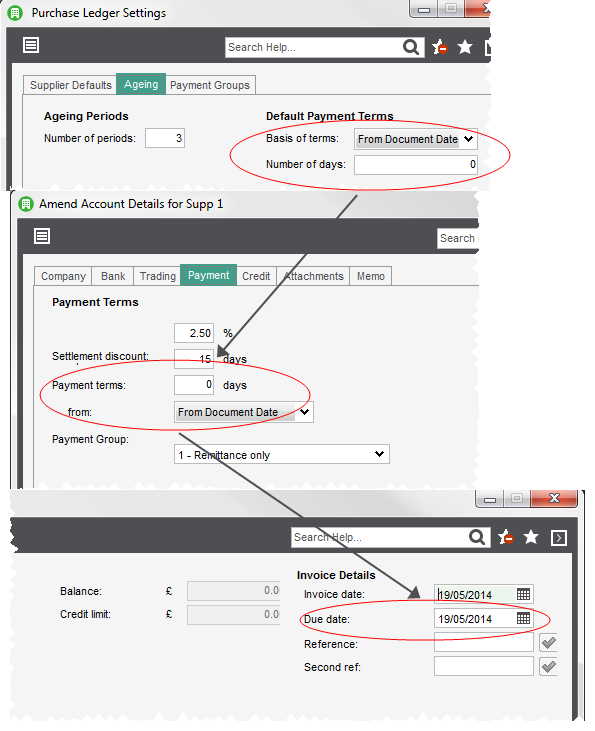
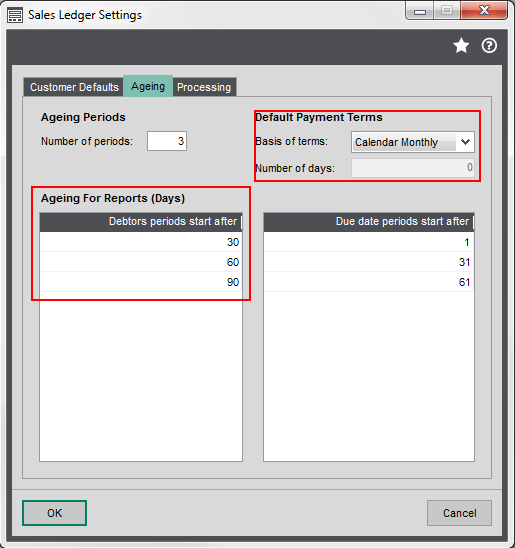
Set default payment terms
You can set default payment terms on the Ageing tab. These are passed on to your
The payment terms set on an account are used to calculate the Due date of an invoice.
If you try to agree the same payment terms with most of your
If you need to, you can change the payment terms on individual
To set your default payment terms:
-
Choose the Basis of terms. This is when the credit period starts from.
What the choices mean- Document date - the number of days after the transaction date.
- Start of month - the number of days after the first day of the month that the transaction is dated in.
- End of month - the number of days after the last day of the month that the transaction is dated in.
- Calendar monthly - the invoice is due on the same day in the following month.
- Enter the default Number of days. This is the number of days credit that
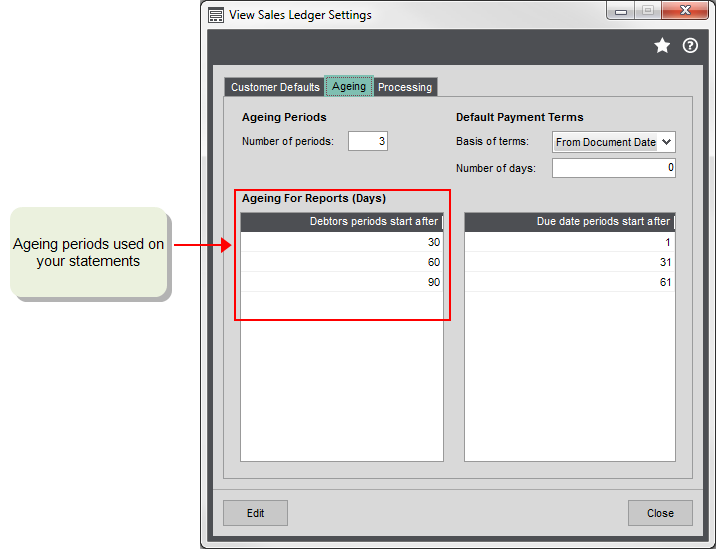
Set ageing periods
Ageing periods are used to show how old your outstanding transactions are.
On the Ageing tab, you choose the number of ageing periods you want to use and the number of days in each period. Generally, debts are aged over 3 periods, which are typically 30, 60 and 90 days, so this is already set up for you.
You can have from 3 to 8 periods of any length (in days). The last period shows any debts for that period or older.
- Enter the Number of periods your want to use.
- In the
Transactions are aged from their transaction date and not their due date.
These ageing periods are used on
The next time you run the aged debtor report, your aged balances will show in the new periods.
Set due date periods
Due date periods are used on the Due Date report
The Due Date report shows the total amount owed
Debtor letters are sent to your customers, based on the number of Due date periods you use. You can have a different letter for each due date period. Sage 200 sends the letter that corresponds to the Due date period that the oldest unpaid invoice falls into.
Your due date periods are automatically set to be the same as your ageing periods but you can change them if you want to.
To change the due date periods:
- In the Due date periods start after grid, enter the length of each due date period (in days).
Set statement options
-
Choose whether to include paid transactions on your statements. This is set on the Processing tab. Choose from:
- All transactions - all transactions are included on the statement, both paid and unpaid. Use the statement criteria Transactions to show date to filter these.
- Outstanding transaction only - Only unpaid transactions are included on the statement. Use the statement criteria Transactions to show date to filter these.
- Outstanding plus all from a specified date - Shows both paid and unpaid transactions up to a date specified on the criteria. After this date only unpaid transactions are included. This sets Transactions to show date criteria to To by default.
-
Choose how transactions are aged on your statements from the Processing tab.
- Transaction date - time elapsed from the transaction date. For example, a transaction dated 01 June will be 30 days old on the 30 June.
- Due Date - time elapsed from the due date of the transaction. For example, an invoice dated of 01 June with a due date of 30 June will be 30 days old on the 30th July.
- By Ledger period - Taken from the period the transaction is dated in. For example, if your ledger periods are calendar monthly, an invoice dated 29th May be in the +1 month period on the 01 June.
Useful info
Payment terms and due dates
This is the length of time you allow your customers before payment of your invoices is due. Most businesses will allow a period of credit before invoices are due to be paid. You'll usually make these arrangements with each customer as different businesses have different requirements.
In Sage 200, you record these Payment terms on each customer account. This is then used to calculate the Due date of your invoices. This helps you see when invoices are due and helps you manage your customer debt.
If you have the same payment terms for the majority of your customers, you can set this a default here. This is then passed on to each account when it's created.
When you enter your payment terms you choose the number of days credit that you've agreed and when this credit period starts from. These options are outlined below:
Invoices are due the specified number of days after the invoice date.
For example, if the Number of days is set to 15 and you enter an invoice with an invoice date of 03/10, the due date for the invoice will be 18/10.
Invoices are due the specified number of days after the start of the month in which an invoice is dated.
For example. if the Number of days is set to 30 and you enter an invoice with an invoice date of 03/10, the due date for the invoice will be 31/10.
Invoices are due the specified number of days after the end of the month in which the invoice was dated.
For example, if the Number of days is set to 15, and you enter an invoice with an invoice date of 03/10, the due date for the invoice will be 15/11.
Invoices are due on the same day the following month. The Number of days is automatically set to 0.
For example, if you enter an invoice with an invoice date of 03/10, the due date will be 03/11.
Due date calculations are only made for invoice transactions. Credit notes always retain the same due date as the entered transaction date.
Ageing your transactions
The total amount due per customer per ageing period is shown on your statements and aged debt reports. How the Sage 200 determines which ageing period a transaction falls into depends what you've set in the customer settings and the criteria you choose when you run your statements and reports.
Age transactions by transaction date
Transactions are aged by time elapsed from their transaction date. For example, a transaction dated 01 June will be 30 days old on the 30 June.
To set this up:
-
Set the number and length of ageing periods on the Customer Settings | Ageing tab. The total amount due is shown per ageing period on your statements.
- Choose to age your transactions by Transaction date on the Customer Settings | Processing tab.
-
Run your statements and set the criteria for Base date for ageing and the Transaction to show date: To, to the same date.
This sets a start date to calculate your ageing periods and includes transactions up to the same date. For example, if you set this as 01 June, transactions dated from 02 May are current, from 02 April are in the 30 day period as so on (if your ageing periods are set to 30, 60 etc).
Use calendar monthly ageing
This ages your transactions based on the calendar month they are posted in. If you're using calendar monthly accounting periods and calendar monthly payment terms, then this makes sure that your reports and statements are consistent. For example, an invoice dated 29th May appear in the 1 month period on 01 June.
To set this up:
-
Set the number and length of ageing periods on the Customer Settings | Ageing tab. The total amount due is shown per ageing period on your statements. Set your payment terms to Calendar monthly.
- Choose to age your transactions by Ledger Period on the Customer Settings Processing tab.
-
Run your statements and set the criteria for Base date for ageing and the Transaction to show date: To, to the same date.
This sets a start date to calculate your ageing periods and includes transactions up to the same date.
- Set the Ageing method to Calendar Monthly on your Aged Debt reports.
Age transactions by due date
This ages your transactions based on the date they're due to be paid. For example, an invoice dated of 01 June with a due date of 30 June will be 30 days old on the 30th July.
-
Set the number and length of ageing periods on the Customer Settings Ageing tab. The total amount due is shown per ageing period on your statements.
- Choose to age your transactions by Due Date on the Customer Settings Processing tab.
-
Run your statements and set the criteria for Base date for ageing and the Transaction to show date: To, to the same date.
This sets a start date to calculate your ageing periods and includes transactions up to the same date.
Sage is providing this article for organisations to use for general guidance. Sage works hard to ensure the information is correct at the time of publication and strives to keep all supplied information up-to-date and accurate, but makes no representations or warranties of any kind—express or implied—about the ongoing accuracy, reliability, suitability, or completeness of the information provided.
The information contained within this article is not intended to be a substitute for professional advice. Sage assumes no responsibility for any action taken on the basis of the article. Any reliance you place on the information contained within the article is at your own risk. In using the article, you agree that Sage is not liable for any loss or damage whatsoever, including without limitation, any direct, indirect, consequential or incidental loss or damage, arising out of, or in connection with, the use of this information.
Other useful information
Set up a Sage 200 company for the first time